


Screen
Suggest EditIntroduction
The screens on the platform are its main element, described by the layout hierarchy. Each component has properties that affect its appearance and behavior. In other words, what the user sees on the page and what actions they perform are described in one class called “screen”. They don’t need to know where the data comes from. It could be a database, api, or any other external source. Building the appearance is based on provided templates (layouts), and all you need to determine is what data will be shown in a particular template.
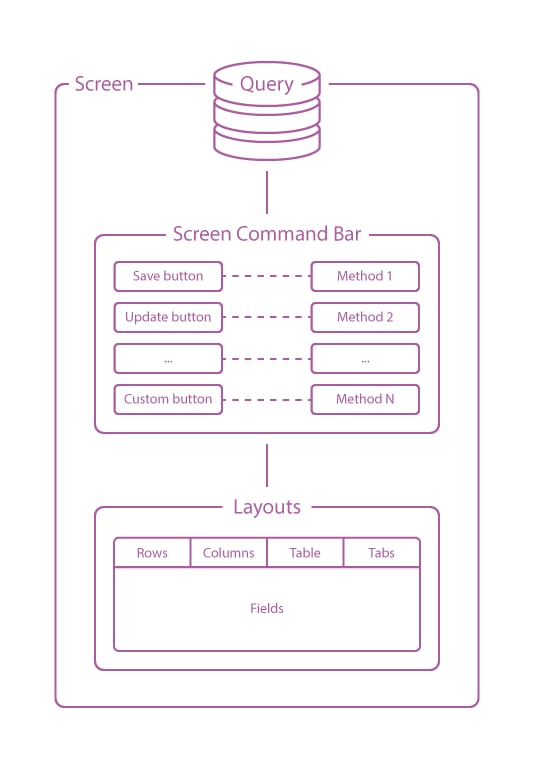
Creating Screen
You can create a new screen by running the command:
php artisan orchid:screen Idea
An Idea file will be created in the app/Orchid/Screens directory with the following contents:
namespace App\Http\Controllers\Screens;

use Illuminate\Http\Request;
use Orchid\Screen\Screen;

class Idea extends Screen
{
    /**
     * Query data
     *
     * @return array
     */
    public function query() : array
    {
        return [];
    }

    /**
     * The name is displayed on the user's screen and in the headers
     */
    public function name(): ?string
    {
        return "Idea Screen";
    }

    /**
     * The description is displayed on the user's screen under the heading
     */
    public function description(): ?string
    {
        return "Idea Screen";
    }

    /**
     * Button commands
     *
     * @return array
     */
    public function commandBar() : array
    {
        return [];
    }

    /**
     * Views
     *
     * @return array
     */
    public function layout() : array
    {
        return [];
    }
}
Registering routes
Before being available at the direct URL, screens, like controllers, must be registered in the routes file
/routes/platform.php. The routes recorded in it will go through the middleware specified in the
configuration. Each screen can be written using the screen method of Route:
use App\Orchid\Screens\Idea;

Route::screen('/idea', Idea::class)->name('platform.idea');
Adding a screen is slightly different from the usual registration, for example, a GET request. Instead of a
single address, a whole group registered. For clarity, you can run the route:list command by Artisan:
Method   | URI                      | Name
---------+--------------------------+--------------
GET|POST | dashboard/idea/{method?} | platform.idea
If you register multiple routes
use App\Orchid\Screens\Idea;
use App\Orchid\Screens\IdeaEdit;

Route::screen('/idea/edit', IdeaEdit::class)->name('platform.idea.edit');
Route::screen('/idea', Idea::class)->name('platform.idea');
Please note, Routing Laravel chooses the first suitable route.
By writing the following routes:
Route::screen('/idea', ...
Route::screen('/idea/edit',...
We get:
URI                           | Name
------------------------------+---------------------
dashboard/idea/{method?}      | platform.idea
dashboard/idea/edit/{method?} | platform.idea.edit
{method?} – means an optional argument that may go further.
Correspondingly, the name “edit” in the address falls under it.
The result will be a redirect to “dashboard/idea/”.
Data Acquisition
The data to be displayed on the screen defined in the query method, where sampling or generation of information
should occur.
The transfer is carried out in the form of an array, the keys will be available in layouts, for their control.
public function query() : array
{
    return [
        'name'  => 'Alexandr Chernyaev',
    ];
}
The source can be the Eloquent model. For this, you need to add the trait AsSource:
namespace App;

use Illuminate\Database\Eloquent\Model;
use Orchid\Screen\AsSource;

class Order extends Model
{
    use AsSource;
}
An example where the order and orders keys will be available in Layouts:
public function query() : array
{
    return [
        'order'  => Order::find(1),
        'orders' => Order::paginate(),
    ];
}
The use of the Eloquent models is not necessary, it is possible to use arrays using theRepository wrapper:
use Orchid\Screen\Repository;

public function query() : array
{
    return [
        'order'      => new Repository([
            'product_id' => 'prod-100',
            'name'       => 'Desk',
            'price'      => 10.24,
            'created_at' => '01.01.2020',
      ]),
    ];
}
Autocomplete public properties
The returned data from the query method will be automatically inserted into the declared public properties
according to their name. For example:
/**
 * @var string
 */
public $message;

public function query() : array
{
    return [
        'message'  => 'Hello World!',
    ];
}

public function name(): ?string
{
    return $this->message;
}
When a GET request is made, the page title will contain the words “Hello world!”.
Actions
The screens include built-in commands that allow users to execute various user scripts.
The commandBar method is responsible for this, which describes the required control buttons.
For example:
use Orchid\Screen\Actions\Button;
use Orchid\Support\Facades\Toast;

public function commandBar() : array
{
    return [
        Button::make('Go print')->method('print'),
    ];
}

public function print(): void
{
   Toast::warning('Hello, world! This is a toast message.');
}
The Button class responds to what will happen when a button pressed, in the example above, when you click on the
Print button, The screen method print will be called, all the data that the user has seen on the screen will be available in
Request.
// By pressing, the 'create' method will be called
use Orchid\Screen\Actions\Button;

Button::make('New function')
    ->method('create');

// By clicking, you will be redirected to the specified address
use Orchid\Screen\Actions\Link;

Link::make('External reference')
    ->href('http://orchid.software');

// By pressing, a modal window will be shown (CreateUserModal),
// in which you can execute the "save" method
use Orchid\Screen\Actions\ModalToggle;

ModalToggle::make('Modal window')
    ->modal('CreateUserModal')
    ->method('save');
Layouts
Layouts are responsible for the screen’s appearance, that is, how and in what form the data will be displayed.
Displaying the appearance of user interface elements in the application is of great importance, makes the application easier to use and helps users to intuitively display screen elements to perform their tasks.
Separation of logic and presentation is one of the design principles with Laravel Orchid.
One of the elements of the presentation are “Layouts” (layouts), which can be displayed in various variations.
If you try to explain briefly, it turns out that this is a view on steroids.
In most cases, we use the same type of elements to form a page, for example, imagine a block that displays the name, signature and profile avatar:
<div class="d-sm-flex flex-row flex-wrap text-center text-sm-left align-items-center">
 <span class="thumb-sm avatar m-r-xs">
        <img src="/avatar/maria.jpg" class="bg-light" alt="Maria">
    </span>
    <div class="ml-sm-3 ml-md-0 ml-xl-3 mt-2 mt-sm-0 mt-md-2 mt-xl-0">
        <h6 class="mb-0">Maria</h6>
        <p class="text-muted mb-1">maria@exaple.com</p>
    </div>
</div>
A simple display of a block with a profile can appear on dozens of pages, and if they are copied, then maintaining
their appearance can take a lot of time, so various reuse options are being worked out. This is called a component
approach, regardless of the delivery method and level of responsibility, it is practiced both in Blade and in
React/Vue/Angular.
It is precisely such components that the platform layers consist of, the only difference is that it is necessary to
operate with the classes, creating which you explicitly determine that the accepted parameter avatar will be
inserted in the <img> tag, without having to edit the source code every time.
Each layout may include a different layout, that is, nesting. For example, the screen is divided into two columns. In the left-field for filling, on the right, there are a reference table and a graph. You can come up with your examples of attachments.
public function layout() : array
{
    return [
        Layout::columns([
            'Left column' => [
                FirstRows::class,
            ],
            'Right column' => [
                SecondRows::class,
            ],
        ]),

        // Modal window
        Layout::modal('Appointments', [
            ThirdRows::class,
        ]),
    ];
}
Sometimes you will want to use the same layout for different things. To reduce code duplication, you can create a configurable design. To pass custom parameters to your layout you can use the class constructor to handle them:
namespace App\Orchid\Layouts;

use Orchid\Screen\Field;
use Orchid\Screen\Fields\Input;
use Orchid\Screen\Fields\Label;
use Orchid\Screen\Layouts\Rows;

class ReusableEditLayout extends Rows
{
    /**
     * @var string
     */
    private $title;

    /**
     * @var string
     */
    private $prefix;

    /**
     * ReusableEditLayout constructor.
     *
     * @param string $prefix
     * @param string $title
     */
    public function __construct(string $prefix, string $title)
    {
        $this->prefix = $prefix;
        $this->title = $title;
    }

    /**
     * Views.
     *
     * @return Field[]
     */
    protected function fields(): array
    {
        return [
            Label::make('label')
                ->title($this->title),

            Input::make($this->prefix . '.address')
                ->required()
                ->title('Address')
                ->placeholder('177A Bleecker Street'),
        ];
    }
}
Instances can be used in the same way, but they can accept parameters
public function layout(): array
{
    return [
        Layout::columns([
            new ReusableEditLayout('order.shipping_address', 'Shipping Address'),
            new ReusableEditLayout('order.invoice_address', 'Invoice Address'),
        ]),
    ];
}
More details can be found in the Layouts section.